Follow Me On Social Media!

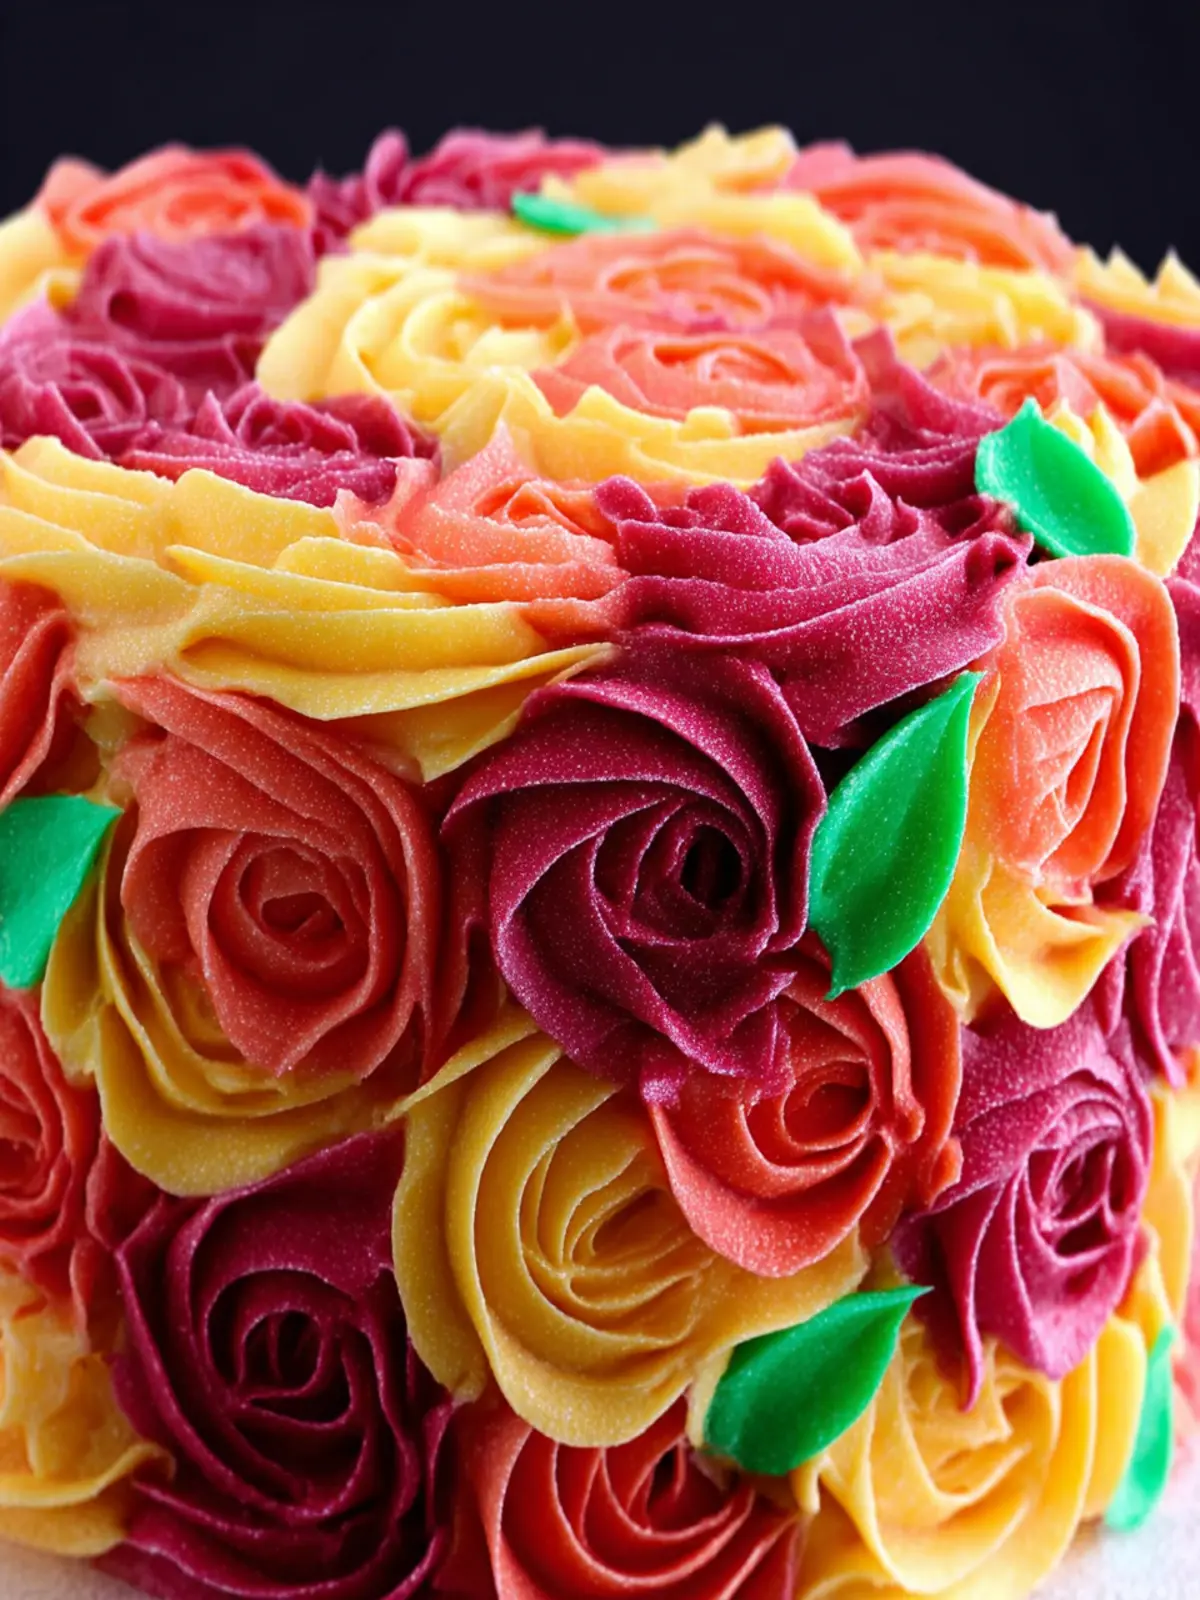
How to Make Rosette Cake: The Best Buttercream Delight
How to Make Rosette Cake {Buttercream}
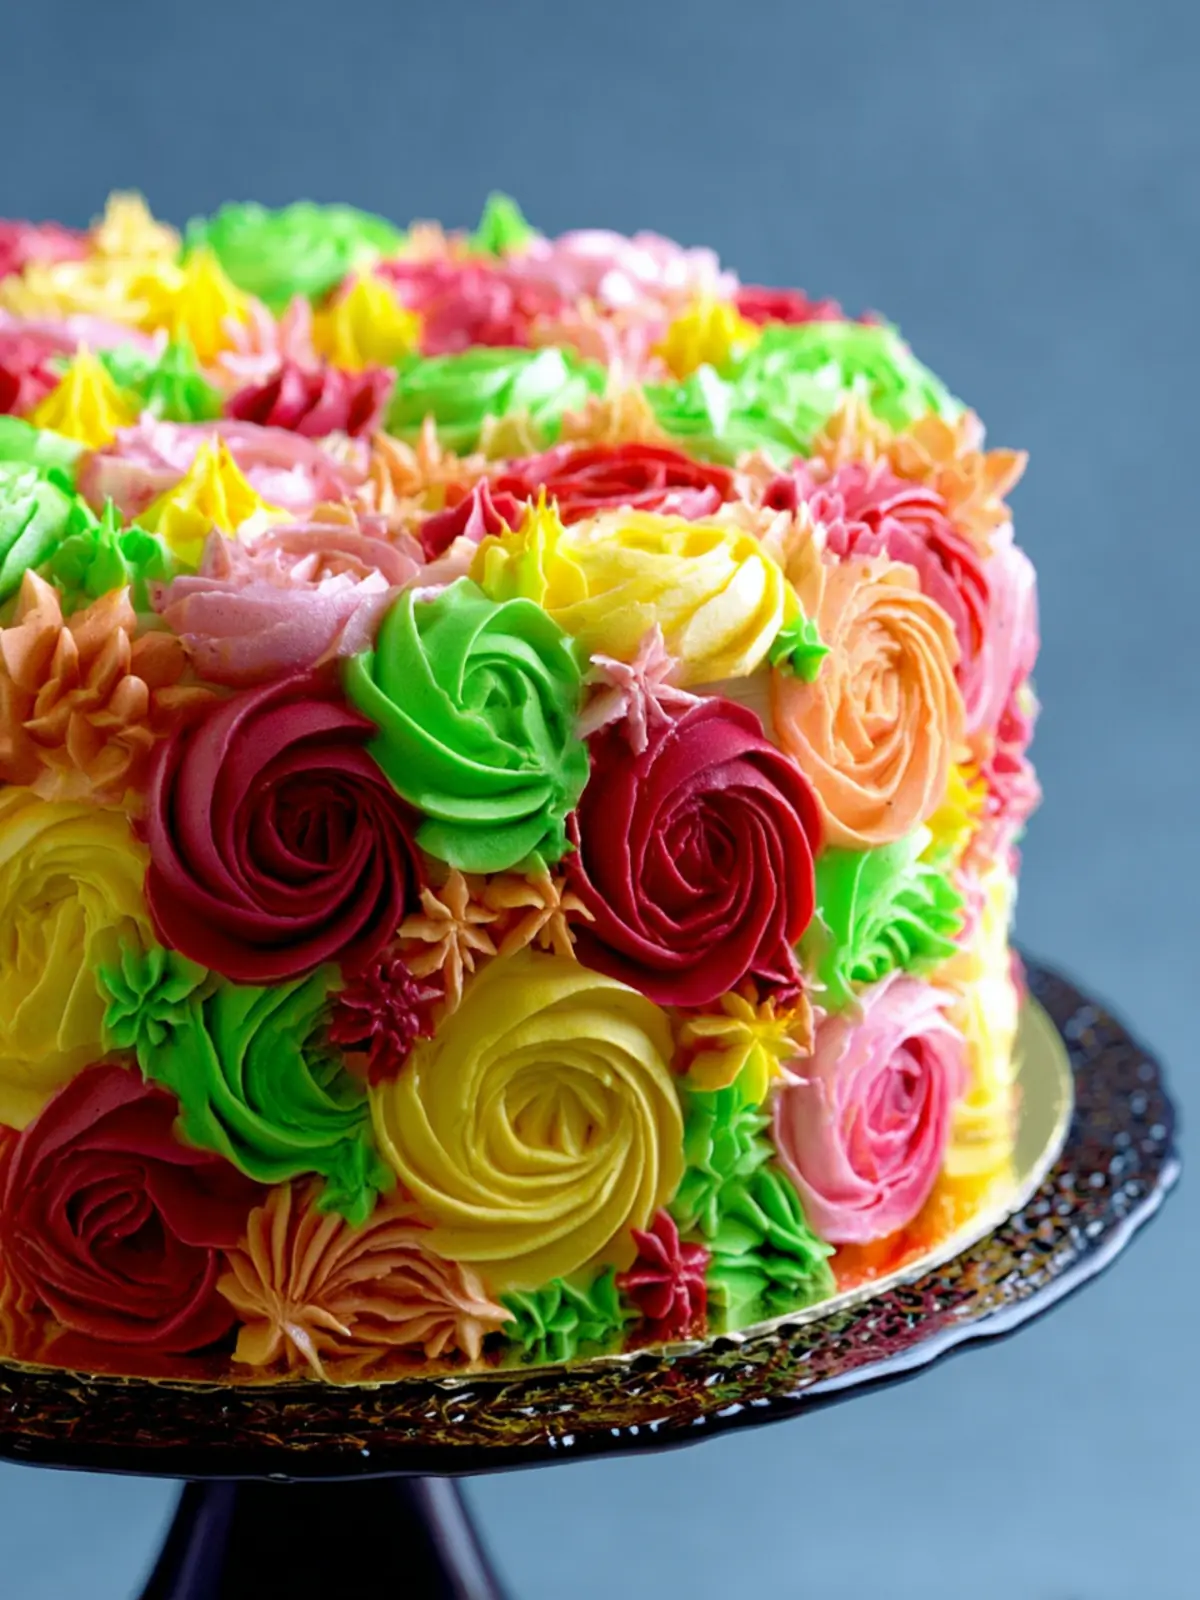
Creating a Rosette Cake is a delightful way to show off your baking skills and add a touch of elegance to any occasion. Picture a stunning cake adorned with intricate buttercream roses, capturing the essence of beauty and flavor in a single bite. It’s not just a dessert; it’s a canvas for your creativity!
What Makes a Rosette Cake So Special?
A Rosette Cake stands out because of its visually captivating design and the delicious, smooth buttercream that makes it a true treat for both the eyes and the palate. Here are a few reasons why this cake is so special:
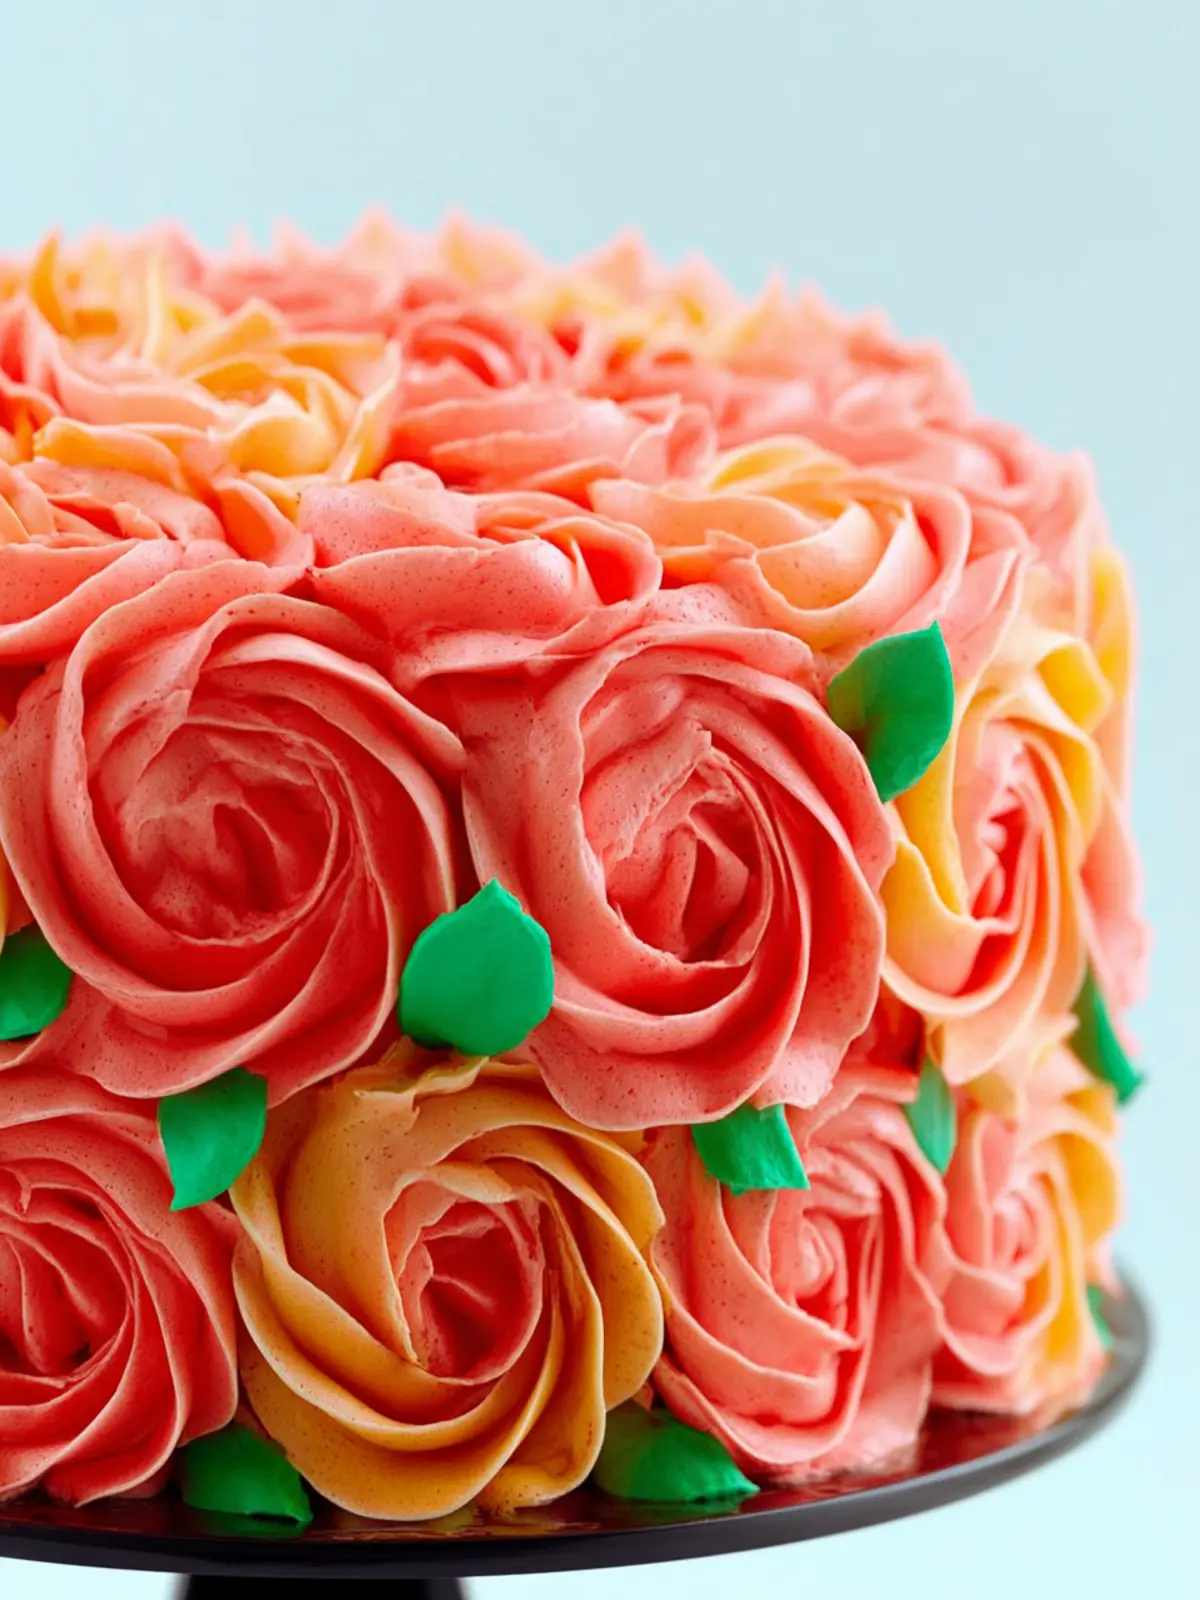
- Artistic Touch: The rosettes created with buttercream give the cake a stunning floral appearance, making it perfect for celebrations, weddings, or even a lovely weekend treat.
- Versatility: You can customize the flavor and color of your buttercream to match any theme or personal preference. Whether it’s vanilla, chocolate, or even a zesty lemon, the possibilities are endless.
- Interactive Experience: Decorating with rosettes can be a fun activity for friends or family. It’s a chance to gather in the kitchen and create something beautiful together.
Key Ingredients for Your Rosette Cake
When preparing to make your Rosette Cake, gathering the right ingredients is essential for achieving that perfect taste and aesthetics. Consider the following when selecting your materials:
-
Cake Base: I prefer using a light and fluffy vanilla or lemon cake. This gives the rosettes a nice contrast and allows the buttercream to shine. You can opt for a store-bought cake or make your own from scratch!
-
Butter: Unsalted butter is crucial for a rich buttercream. It offers that creamy texture we all love, making the frosting easy to work with and gorgeous when piped.
-
Powdered Sugar: This sweetener helps achieve a smooth buttercream that holds its shape when piped, ensuring your rosettes look as stunning as they taste.
-
Heavy Cream: Adding a bit of this makes your buttercream lighter and fluffier, so it pipes beautifully.
-
Flavoring: Vanilla extract or any other essence you enjoy can elevate the flavor of the buttercream significantly.
Remember, your Rosette Cake is not just about looks—it’s about flavor, texture, and, most importantly, the joy of baking! So, roll up your sleeves and get ready to impress with this beautiful cake.
Key Ingredients for Rosette Cake
Rosette Cake is a delightful way to impress friends and family with your baking skills. The key to achieving that beautiful, eye-catching rosette design lies not just in technique but also in choosing the right ingredients. Here’s a breakdown of what you’ll need to create this stunning cake.
-
Cake Flour: I love using cake flour for a tender crumb. Its lower protein content makes for soft, fluffy layers that pair perfectly with the buttercream. If you can’t find cake flour, a substitute can be made by mixing all-purpose flour with cornstarch.
-
Unsalted Butter: Quality is key here; I recommend using unsalted butter for both the cake and the buttercream. This allows you to control the saltiness while creating a rich flavor profile.
-
Granulated Sugar: A classic choice for sweetness, granulated sugar helps to build the structure of your cake. It also caramelizes slightly, adding to that lovely golden crust.
-
Eggs: Large eggs are crucial for richness. They provide moisture and help with the cake’s rise. I usually let them come to room temperature for better incorporation.
-
Vanilla Extract: Pure vanilla extract adds depth and complexity to both cake and frosting. Trust me, it elevates the flavor to another level.
-
Heavy Cream: This is not just for drizzling; it’s essential for creating that luxurious whipped texture in the buttercream. The cream adds richness that balances the sweetness.
Choosing these key ingredients carefully will set you on the right path for mastering how to make rosette cake. Happy baking!
Why You’ll Love This Rosette Cake
There’s something undeniably enchanting about a rosette cake. The delicate swirls of buttercream not only please the eye but also beckon the taste buds with promises of rich flavor and moist texture. Picture this: gathering your friends for a weekend brunch, and as you unveil this masterpiece, their jaws drop in awe. That moment is what makes baking this cake truly special.
The magic begins with the buttercream frosting—smooth, creamy, and oh-so-sweet—decorating each layer and adding an irresistible charm. It’s just like those bakery treats you’ve always admired yet thought impossible to replicate at home. But the beauty of this rosette cake lies in its accessibility! With simple ingredients and a few easy steps, you’ll soon be the star of any gathering.
What you may love most is the ability to customize it. Whether you prefer classic vanilla, chocolate, or even a hint of citrus zest, this cake caters to every palate. Plus, it’s perfect for celebrations or just a cozy night in. With each slice, you and your loved ones will appreciate not just the taste but also the time spent crafting this sweet delight together. So let’s dive in and learn how to make rosette cake that will leave everyone enchanted!

Variations on Rosette Cake
Exploring how to make rosette cake opens the door to a world of delightful variations that can suit any occasion and personal taste. While the classic buttercream rosettes are mesmerizing, why not try something a little different?
Flavor Twists
-
Chocolate Rosette Cake: Incorporate cocoa powder into your buttercream for a chocolatey explosion. This base pairs beautifully with contrasting flavors like raspberry or orange zest to keep things fresh.
-
Lemon Zest Delight: Add a burst of citrus by mixing lemon zest into your vanilla buttercream. This variation is perfect for spring celebrations and offers a light, refreshing twist.
-
Red Velvet Rosette Cake: Use red velvet as your cake base with cream cheese buttercream. The deep red color combined with creamy white rosettes creates an eye-catching centerpiece.
Colorful Options
-
Rainbow Rosette Cake: Use gel food coloring to create a rainbow effect. Applying concentric swirls with different colors can turn your cake into a vibrant masterpiece, perfect for birthdays.
-
Pastel Palette: For a softer look, simply mix your buttercream with pastel colors like mint green, baby blue, or lavender. This adds an elegant charm that’s great for baby showers or bridal events.
Fondant Accents
- Add Fondant Flowers: While the rosettes steal the show, consider adding a few fondant flowers as accents for a more upscale feel. They can serve as the perfect complement to your design.
Incorporating these variations can truly make your rosette cake a specialized creation that reflects your personality and style. With endless possibilities, the only limit is your imagination!
Cooking Tips and Notes for Rosette Cake
When diving into the delightful world of baking, the Rosette Cake is a stunning treat that combines beauty with flavor. Learning how to make rosette cake can be an enjoyable experience, especially when you have a few tips and tricks up your sleeve to elevate your baking game.
Choosing the Right Buttercream
- Quality Butter: Stick to high-quality unsalted butter for your buttercream. This ensures a rich flavor and a creamy texture without unnecessary saltiness.
- Room Temperature: For the best results, allow your butter to soften at room temperature before mixing. This will help achieve that light and airy consistency we love in buttercream.
Mastering the Cake Layers
- Leveling: Ensure your cake layers are level for the best rosette design. A simple tool like a cake leveler or a serrated knife can help create flat tops for even stacking.
- Chilling: After frosting your layers, chill the cake for about 30 minutes before adding rosettes. This helps to set the buttercream, making it easier to pipe.
Perfecting Your Rosette Technique
- Piping Tips: Use a 1M or 2D piping tip for beautiful rosettes. Practice on parchment paper if you’re unsure before piping directly on the cake.
- Pressure Control: Begin piping with consistent pressure, releasing just as you pull away. This motion creates the lovely petals of the rosette.
With these tips, you’ll be well-equipped to create a stunning Rosette Cake that not only tastes incredible but also impresses your friends and family! Enjoy the baking journey and happy decorating!
Serving Suggestions for Rosette Cake
Rosette cake is a stunning centerpiece that comes alive with creativity when it’s time to serve. To elevate your cake experience, consider these thoughtful serving suggestions:
-
Elegant Presentation: Slice the cake into wedges, showcasing the intricate rosette design. Consider serving each slice on a beautiful china plate for a touch of sophistication.
-
Accompanying Treats: Pair your rosette cake with fresh berries or a dollop of whipped cream. These complements enhance the flavors and offer a delightful contrast to the rich buttercream.
-
Flavor Pairing: Serve with a cup of aromatic tea or coffee. The warmth of the beverage beautifully balances the sweetness of the cake.
These ideas make your rosette cake not just a dessert, but a memorable experience for friends and family.
Time Breakdown for Making Rosette Cake
Creating a beautiful rosette cake is an enjoyable endeavor, but knowing how to manage your time can make all the difference. Let’s break down the essential stages to keep your baking experience smooth and efficient.
Preparation time
Setting aside about 30 minutes to gather all your ingredients and equipment is a great start. Make sure your butter is softened and your utensils are ready for use.
Baking time
Once you have everything prepared, the baking process takes approximately 25-30 minutes. Keep an eye on your cake’s golden hue, and remember to check for doneness with a toothpick.
Cooling time
Allow your cake to cool in the pan for about 10 minutes before transferring it to a wire rack. You’ll want to let it cool completely for at least an hour, so your buttercream frosting can be applied smoothly.
Decorating time
Finally, decorating your rosette cake can take around 30-45 minutes. Take your time to create those lovely rosettes, and don’t rush. It’s all about enjoying the process!
Nutritional Facts for Rosette Cake
Understanding the nutritional facts for Rosette cake can help you savor every delicious bite without worry. This delightful dessert, adorned with creamy buttercream, might tempt you to indulge more than once!
Calories
A typical serving of Rosette cake contains about 400 calories. While it’s a treat, sharing with friends or saving part for later can help you enjoy without excess.
Total Fat
This cake carries approximately 20 grams of total fat per slice. The butter and cream contribute significantly to its rich texture, making every bite satisfying.
Sugar
Each serving delivers around 30 grams of sugar, providing that delightful sweetness we all love in a cake. Balancing it with a cup of tea or coffee could enhance the experience while keeping it enjoyable.
Having the right knowledge of how to make Rosette cake allows you to appreciate its flavors fully while enjoying it mindfully!
FAQs about Rosette Cake
Creating a stunning Rosette Cake can spark questions, especially for those venturing into the world of cake decoration for the first time. Let’s delve into some common queries surrounding this delightful treat, focusing on how to make your baking experience as smooth as possible.
Can I use a different type of cake?
Absolutely! While the classic butter cake works beautifully for a Rosette Cake, you can experiment with other flavors. Vanilla, chocolate, or even lemon cake can serve as a fantastic base. Just ensure the cake is sturdy enough to support the buttercream rosettes—avoid overly crumbly cakes.
How long can I keep the cake?
Depending on how you store your Rosette Cake, it can last quite a while! If kept in an airtight container at room temperature, it should stay fresh for up to three days. For longer storage, consider refrigerating it, where it can hold up to a week. Just be aware that refrigeration may alter the texture of the buttercream slightly.
What if I don’t have piping bags?
No piping bags? No problem! You can create your own makeshift piping bag by using a zip-top plastic bag. Just fill it with your buttercream, snip off a corner, and you’re good to go. Alternatively, you can use a simple spoon to dollop and spread the buttercream onto the cake. While it won’t be quite the same as the traditional rosettes, you can achieve a lovely textured finish.
By addressing these FAQS, you can navigate the world of Rosette Cake with confidence and creativity! Happy baking!
Conclusion on Rosette Cake
In crafting the perfect Rosette Cake, you celebrate not just a dessert but a canvas for creativity and flavor. The magic lies in the rich buttercream that dances on the cake layers and the stunning rosettes that steal the show. As you navigate through the steps on how to make rosette cake, remember that practice will refine your piping skills and elevate your cake decoration game. Whether for a birthday, wedding, or just a weekend treat, this cake is sure to impress your guests and, more importantly, bring joy to your heart. Share it, enjoy it, and revel in the sweet moments it creates!
Print
Chocolate Raspberry Cake
- Total Time: 1 hour
- Yield: 12 servings 1x
- Diet: Vegetarian
Description
Delicious chocolate raspberry cake decorated with colorful buttercream frosting.
Ingredients
Scale
- 2 Chocolate raspberry cakes
- 5 cups American buttercream frosting (Divided and colored white, green, yellow, pink, red)
Instructions
- Bake cakes and allow them to cool completely.
- While cakes are baking and cooling, prepare the frosting and color it with gel colors or liquid colors.
- Place one cake on serving dish or a cake stand.
- Spread white icing on top.
- Place the other cake on top and press gently to secure together.
- Ice the entire cake smoothly in white buttercream.
- Fill separate piping bags with different colors of icings. Attach Wilton’s Tip # 21 to each bag.
- Pipe little roses randomly all over the cake, using a circular wrist movement.
- Pipe little stars to fill any gaps between flowers.
- Enjoy!
Notes
- This cake is perfect for celebrations.
- Experiment with different colors for the buttercream to customize your cake.
- Prep Time: 30 minutes
- Cook Time: 30 minutes
- Category: Dessert
- Method: Baking
- Cuisine: American
Nutrition
- Serving Size: 1 slice
- Calories: 400
- Sugar: 30g
- Sodium: 150mg
- Fat: 20g
- Saturated Fat: 10g
- Unsaturated Fat: 5g
- Trans Fat: 0g
- Carbohydrates: 50g
- Fiber: 2g
- Protein: 4g
- Cholesterol: 50mg